Homemade bowl and flowers

I love this display because it’s so fresh and spring like.

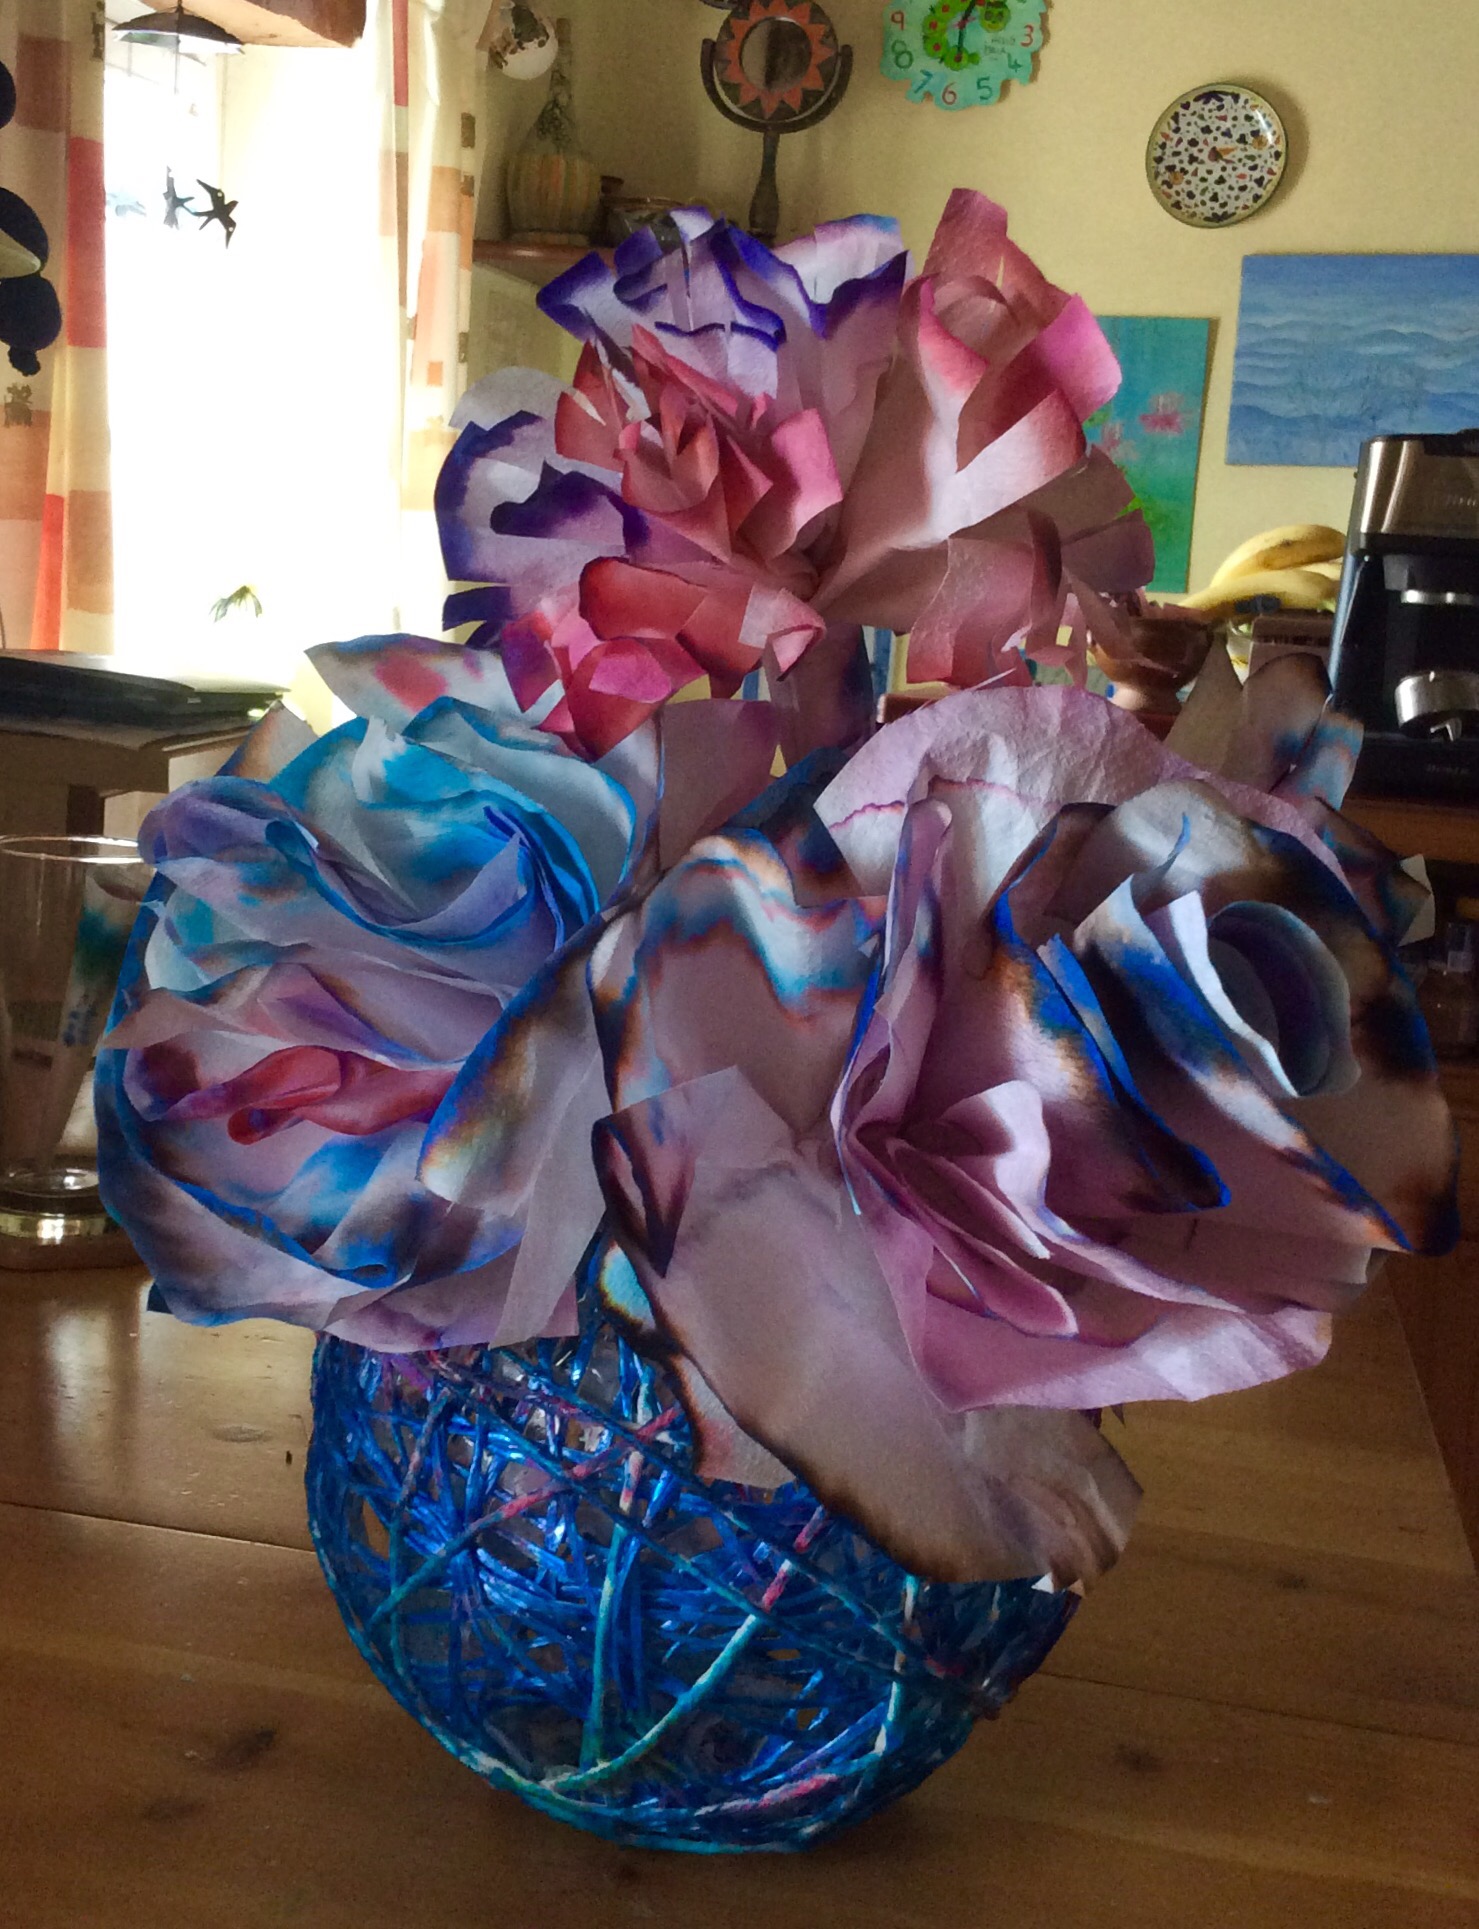
It’s also fun and cheap  to make.

I always like posting something which involves children helping and this post is no exception. With help even the youngest will enjoy making the flower petals from coffee filter bags and they will learn a little about chromatography at the same time!  The video instructions are on the link below.

How to make the filter paper flowers

Putting the flowers together is more tricky and a task for older children or adults.

The Bowl
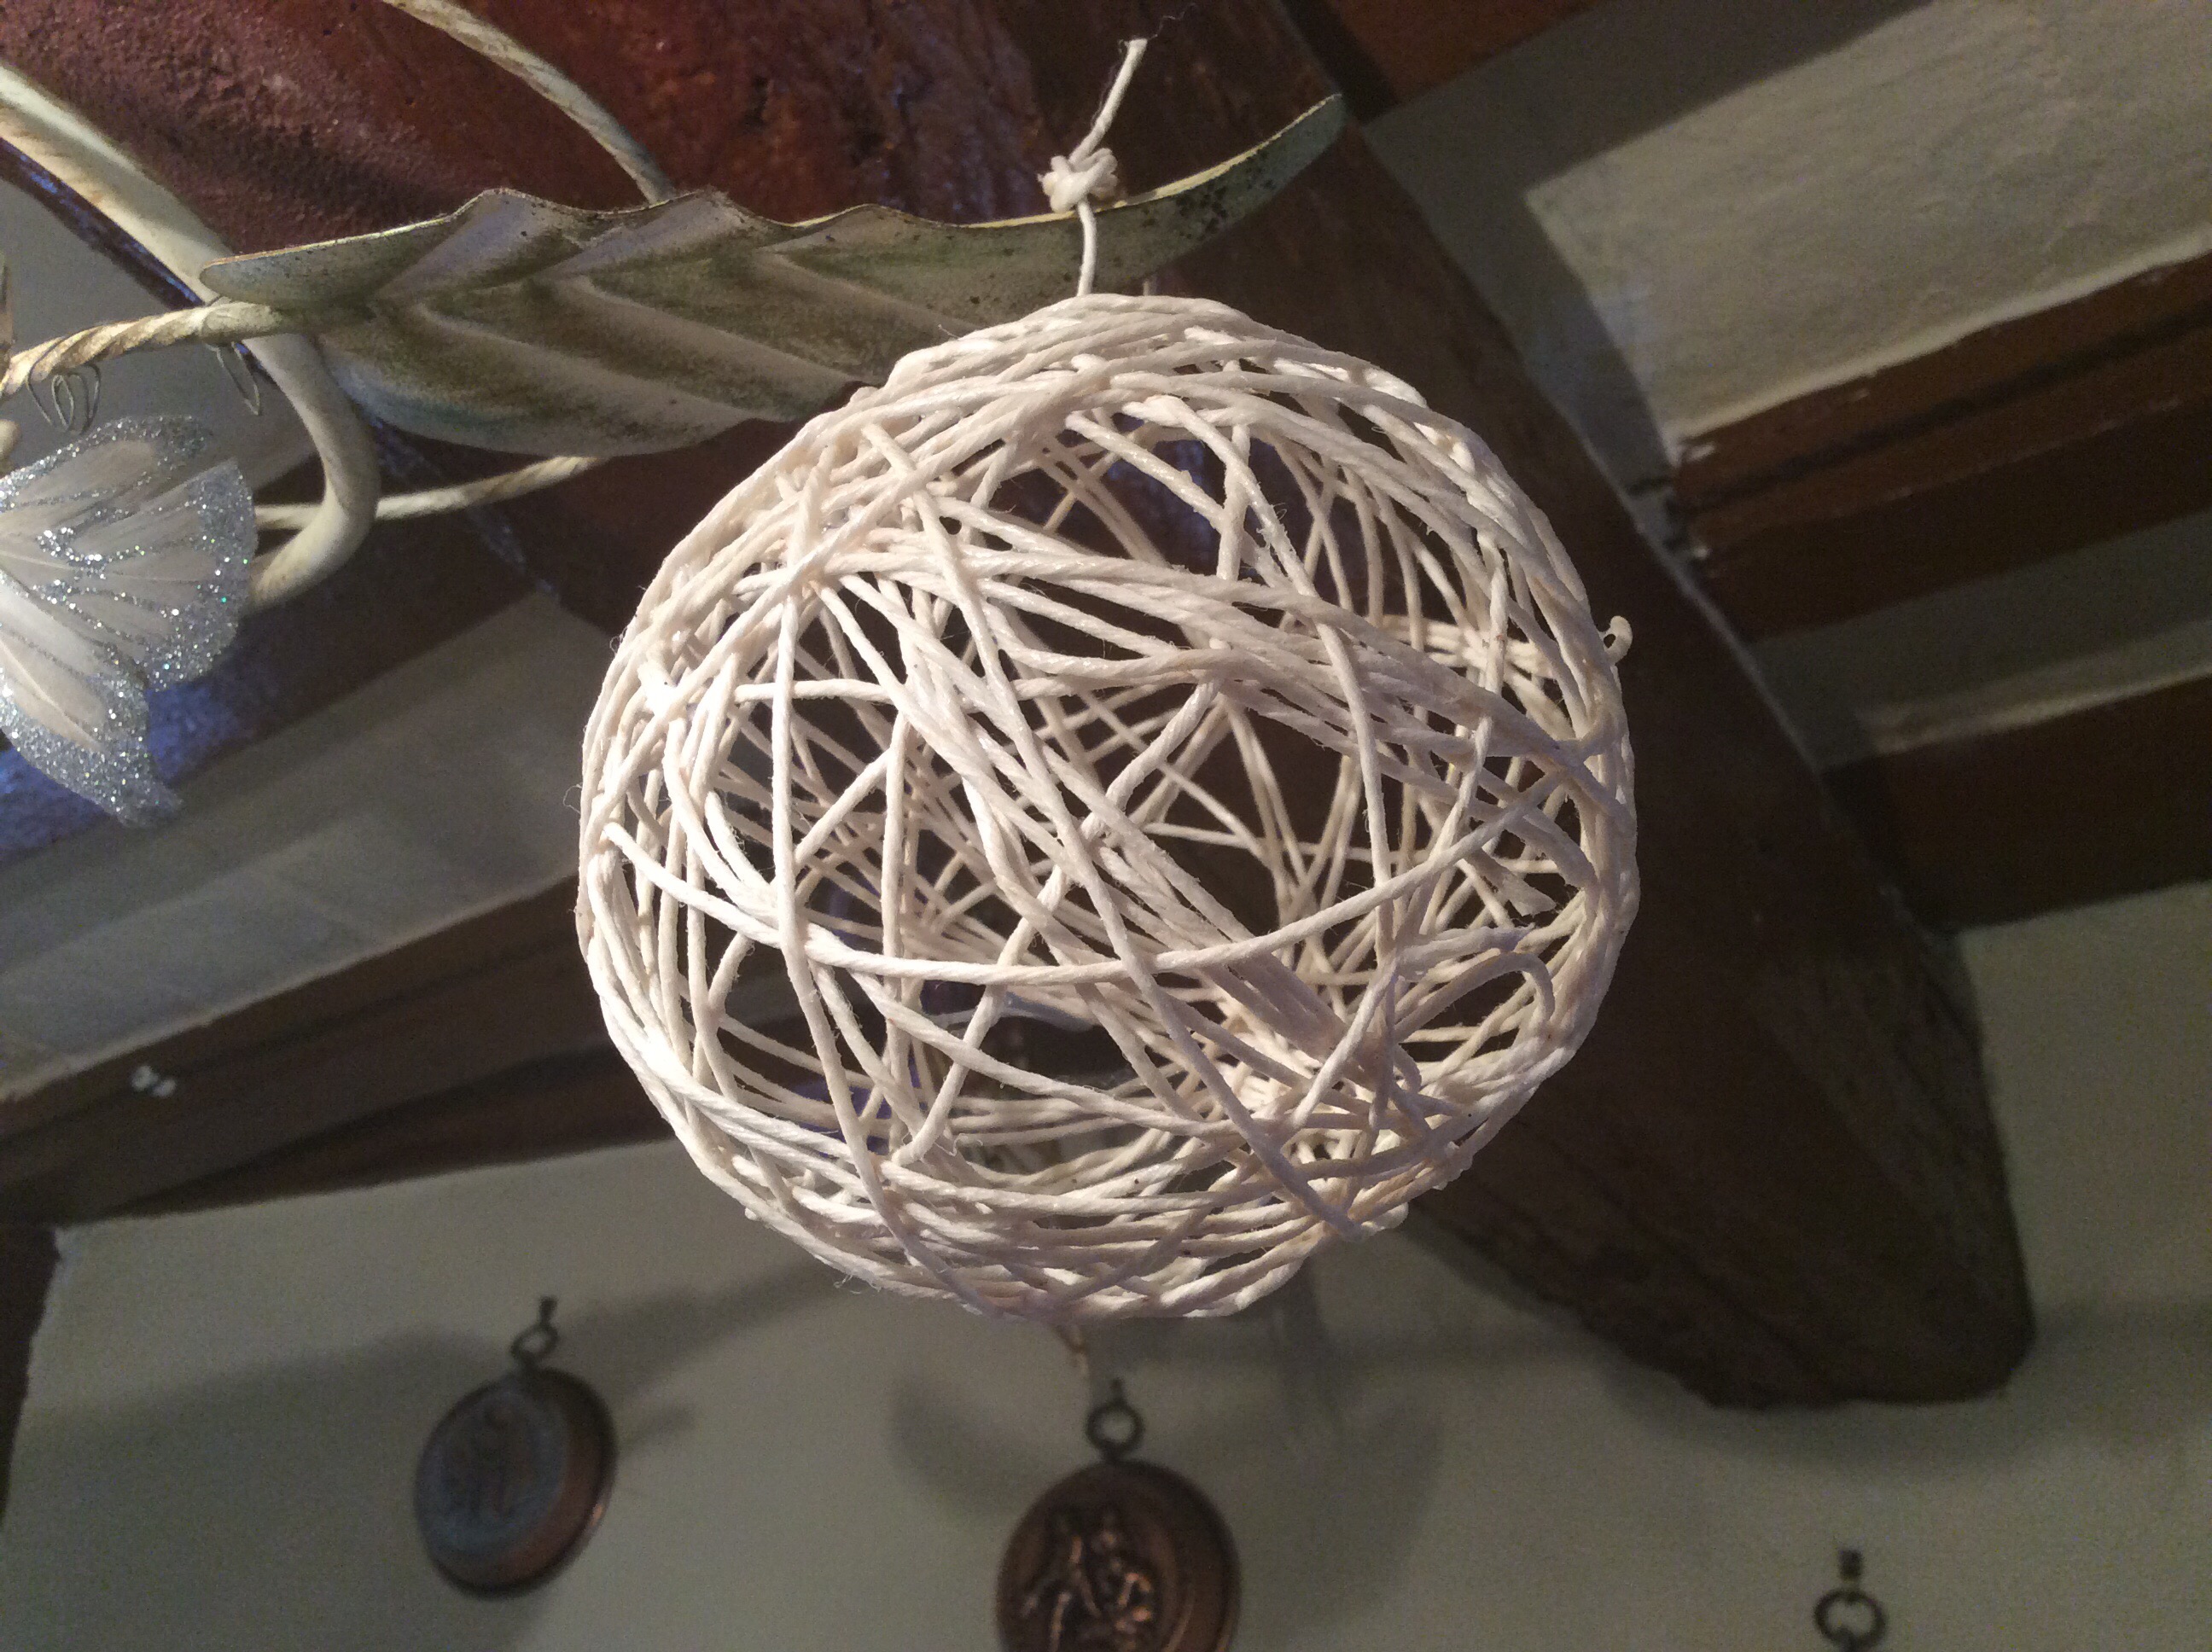
The bowl is made entirely from string which is soaked in glue and wrapped around a balloon. The fun bit that kids love is the popping of the balloon once the glue has set!

The level of difficulty depends on the size of the balloon.  For the blue bowl featured above the balloon was well inflated making it trickier to handle.

At Christmas we followed the same procedure to make baubles but using much smaller balloons which are easier to handle.  If your children are small my suggestion would be to help them make the  smaller bowls which can be used for biscuits or Easter Eggs while you make the trickier large bowl.

The instructions to make the string balls are given in ‘child friendly’ format on the link below.  To make the balls into bowls all you need to do is cut them in half using either very strong scissors or a craft knife and then neaten the edges.

I hope you enjoy. If you do please add a nice comment !

Follow this link for the video instructions for children

For many more art, craft, science and learning videos please visit our channel:

The Jumble Fun Channel 

Puppet Theatre

Take a cardboard box, a couple of wooden spoons and a couple of puppets. Add a small child and you have hours of fun, imagination and creative learning.

Don’t waste time making it ‘pretty’. If the kids are enthusiastic let them use it immediately. Decorations an£ backcloths can wait!

Disaronno 

I’ve re-published this post after seeing the supermarket had lots of DISARONNO on the shelves yesterday. It’s obviously very popular around Christmas . It’s definitely a craft for adults . Rather fiddly and very messy but fun and it turned out really well. I used a flashing ‘litecube’ for the photographs but any type of LED light would work. .

For more fun but easier Crafts with string see my post:

Make string Baubles 

This link takes you to a video showing how to make string Baubles..


Below is a bowl made in the same way as the string Baubles using a balloon as a base. 

Inspiration for Learning

‘ i Light Marina Bay’ is an amazing light art festival. For three weeks each year exhibits from talents around the world illuminate the urban areas of Marina Bay. with interesting, fun and beautiful light/art installations.

Many of these are interactive and one of my favourites (above) appeared in the 2014 event.

The next event is in March 2018.

For information see this link:

: iLIGHT Marina Bay 2018

BLUE!

While we are on the ‘blue’ theme let’s look at some fun art and science activities.

Younger children will have fun and learn about making pastel shades of blue by simply moving a paintbrush filled with blue acrylic paint about in a dollop of white paint. The paint moves much better on a plastic paint. Don worry that they are ‘spoiling’ the effect by carrying on too long. They will do! It’s part of the learning process.

To limit the choice of colour to just one plus white is a good exercise for older children. It’s amazing how many different ‘blues’ can be made with just one shade plus white. This encourages them to be much more imaginative in their paintings especially of subjects like skies and water.

White glue and be added to the white paint before. This enables paintings to have a 2D effect. So once they are dry the painting can be felt as well as seen .

Older children will enjoy using this technique to represent mountains or waves in the sea.

Blue painting or drawings deserve a nice blue frame to set them off and what could be nicer than one made by hand.

The on3 below was made by rolling pages from a magazine round a straw. Then they wee cut to size. Looking through a magazine for pages which are predominately blue is a good observational exercise

Making a string bauble:

These are good as Christmas decorations but can also be made into bowls and lamps.

For details go to the link below:

String Baubles

Last but not least!

Changing the colour of a white flower to blue. Chicory and white cabbage leaves can also be used. This is where art meets science. Children enjoy the magic of watching as the blue food colouring Ives through the veins of the flower or vegetable leaf. They also learn how the plant gets its water.

To watch Lizzie performing this experiment an£ for some variations, watch the link below:

Change the colour of a flower

You can even join in and make a blue lamp!

For instructions see this link:

Di Saronno Lamp

Happy Chicken

Sorry I don’t do quantities which is, I know is very annoying (the family continually say this) but I just throw a bit in, look, taste and adjust! They like the result so what!!

So, is it healthy? Well it depends which advice from our dear UK Government you are referring to! Was it the year they said that cream , cheese, butter and all saturated fat was bad? Or the year they said sugar was the enemy?

So for Happy Chicken which is creamy and delicate but has a great earthy garlic taste and a hint of lemon, look at this link:

Happy Chicken Recipe

Make a Spider Toy

Unfortunately. Not many people love spiders which is a pity because they work very hard keeping down the pesky insect population. Try looking at them differently and begin with making a fun one for Halloween. It will only take about ten minutes and the kids can help.

Click on this link to make your own Jumble Spider

Above: A ‘Cup and Saucer’ web

A Fun Table Decoration

Warning: Sharp knives are required.

This is a fun twist on the old favourite, oranges decorated with cloves.

Although children can’t hollow out the orange, they can insert the cloves. They could also make the tiny oranges while you make the centrepiece.

They will definitely want to insert the ice cube !

The flashing light inside the orange is a lite-cube. A fancy party item available on Amazon. It is designed to drop into drinks and lights up and flashes on contact with water or liquids.

If you prefer an ordinary candle can be used instead.

A Fun Orange Table Decoration

http://www.jumblefun.net

http://tinyurl.com/funjumbles

Fun shape Art and Maths activity

Young children are naturally creative and love drawing and painting and making things.

They will enjoy the activity shown in the video above and learn some new shape and size  vocabulary at the same time.,

Recognising shapes within objects  improves observational skills and is a good grounding for drawing and sketching.

Although designed for preschool aged children this activity can be adapted to suit any age depending on the chosen object.

Make a Snowman Lamp

This is a ‘sharing’ activity. I suggest you watch the video with your child then make the Lamp together. A glass jar is used and so care and supervision is essential. Children learn so much by sharing an activity. As you are making this together you will talk and ask and answer questions introducing new vocabulary. Memory will be improved as will their organisational skills and ordering and fine motor skills. Children will learn how to use different glues, about cutting and sticking, about safety., about making mistakes and trying again.

Very small children will be able to stick blobs of cotton wool onto the ball to make the head and will enjoy placing the eyes and buttons in 0lace.

What you need:

A glass jam jar.

Some cotton wool or stuffing from inside a pillow.

For the head: I used a string bauble I had left over from last year but a plastic ball would work fine.

For the hat: – Sticky backed foam sheet in black and a glittery colour (I used red) you can manage with black card and ribbon

White glue plus a stronger glue for the eyes and the hat if you are using card.

Eyes.

A scarf. I used the glittery red foam but you could use ribbon or a thin strip of fabric.

An LED light . I used a LITE cube.

A tip:

Only use a thin layer of cotton wool on the body so the light shines through.

Error
This video doesn’t exist

Painting with Glue


This is fun for any age and the process can be adapted in so many ways for different effects. It is very versatile and even completely unplanned and random application of the glue by very young children, results in really great abstract pieces of art. (See below).


The best surface to use is a canvas board but very hard card works well too.

For small children use a small plastic container of glue which they can squeeze easily.

In the video I used a cheap set of paints produced for children.

Better results will be achieved with watercolour and acrylic paints give a stronger colour.

Glue can be applied to a white board or the board can be painted first and you can use as many layers of glue as you like.

Watch the video below:
PAINTING WITH GLUE 


For more Art and Craft ideas and learning videos see my channel:  http://tinyurl.com/funjumbles